
Table of Contents
Cartzy enables you to configure the page navigation of your store efficiently by setting up header and footer menus explicitly.
- Header: In your Cartzy store, you can add a maximum of 9 menu items to the header.
- Footer: In the footer of your store, you can add a maximum of 10 menu items.
The menu items are linked to the other pages of your store.
Path: Store Management > Navigation

Adding and saving a new menu item
To add a new menu item to the header or footer, do the following:
1. Add the menu item name in the first field.
2. Add the URL of the page in the Link field.
Internal link: If you are linking the menu item to another page of your store, you just need to add the string that appears after the domain name in the URL of your store. For example,
- Store domain: https://mycartzy.com
- Link of the page: https://mycartzy.com/products
- String to be added in the Link field: /products
External link: If you are linking the menu item to any page that is external to your store website, then you need to enter the complete URL. For example, if you are linking a menu item to a training video on YouTube, then the URL will be: https://www.youtube.com/watch?v=P1SW3h9ex7o
3. Click the Save icon given next to the Link field.

Hiding and unhiding a menu item
If you no longer want a menu item to appear in the header or the footer of your website, you can simply click the eye icon to hide it. Once, you click on it, the eye icon will bear a slash on it, and a success message will also appear in a popup notification.

Now if you refresh your website, you will notice that the hidden menu item no longer appears in the header/footer wherever it existed before.

Similarly, if you want to make a hidden menu item available in the header/footer, you will click on the shut-eye icon to unhide it.

💡Hiding/unhiding is an efficient way of removing unwanted menu items as it allows you to restore the changes in a single click whenever needed. However, if you delete a menu item altogether, you will have to add it again, if needed in the future.
Deleting a menu item
Deleting a menu item should always be your second option for removing a menu item from the header/footer. You should delete a menu item only when you have exhausted all of the menu item fields, and you can no longer add a new one. In this case, hiding a menu item will not help you. You will have to delete it to add a new one.
To delete a menu item, simply click the bin icon given next to the menu item fields. Upon deleting, the following will occur:
- The menu item label and link fields will become blank.
- A success message will appear in a notification popup at the top right corner of the page.
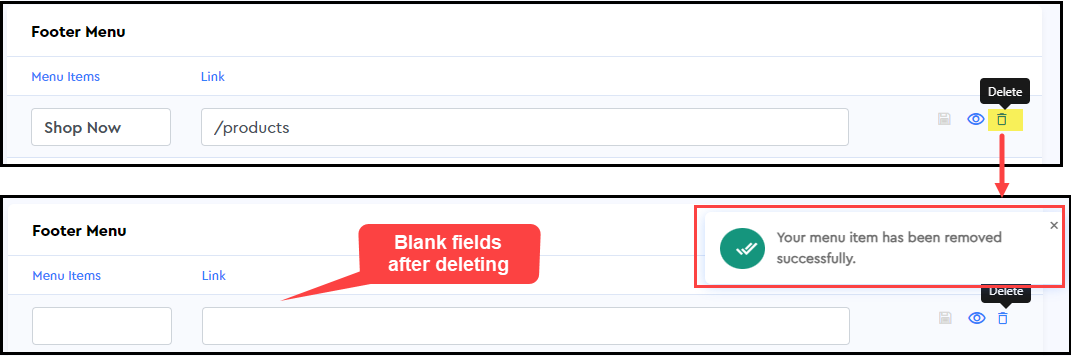
The image below demonstrates the contents of the footer before and after deleting a menu item.
