Table of Contents
- Product information
- Media
- Product management
- Collection
- Tags
- Inventory
- Product options
- Pricing
- Search engine listing preview
- Feeds
- Sales channels
- Product visibility
- Success message
- Front end of the product page
90% of the time the products in Cartzy are imported using the ProfitSpy tool for dropshipping purposes. However, there can be instances where you want to create your own product in the store and also want to publish it across multiple sales channels such as Walmart. For that, 10% of the time when you need to add a product manually to your Cartzy store, you can use the Create Product feature in Cartzy.
Adding a new product manually to your Cartzy is very straightforward. On the Add Product page, you are provided with various sections for filling in your product details. It ensures structuring the product information in an organized manner which improves readability and enhances end-users' experience.
Path: Products > All Products > Click the Create Product button > Add Product.

Listed below are the sections that can be filled in to provide complete information about your product.
1. Product Information
2. Product Management
3. Media
4. Collection
5. Tags
6. Inventory
7. Product Options
8. Pricing
9. Search Engine Listing Preview
10. Feeds
11. Sales Channels
12. Walmart Required Information
Product information
Under this section, you need to enter the title and the description of the product. Whatever you enter here will appear on the product page. That is why you are advised to keep your content SEO-friendly so it appears in search results when potential buyers search for the product on your store.
Using the text editor features, you can format the description content as per your branding requirements.

Media
This section enables you to attach media files (images, videos) with your product for the customers to get an idea about the product before they make the purchase.
You can add images and insert a YouTube video link.
Images
Images can be added by two methods:
1. Upload from device
2. Add an image via the URL
Upload from device
To upload an image from your device, simply click on the plus "+" icon. It will open the file browser for you to select the desired image from your device.
Once you add the image, its thumbnail will appear indicating that the selected image has been attached to the product information.

Add media from the URL
You can also insert an image using the URL of the image file. It will directly fetch the image from the directory.
To do so, follow these steps:
1. Click on the ADD MEDIA FROM URL option on the Media section's right side.
2. On the Add Image From URL popup window, paste the URL address of the image, and click the Add Media button.
3. The image will be uploaded from the pasted URL, and its thumbnail will appear in the Media section.

Video
You can only embed YouTube videos on your product pages.
To add a video showcasing your product features, you need to first upload it on YouTube, and then acquire its YouTube URL to add to the product page. Once, the YouTube URL is available, follow these steps:
1. Click on the Embed YouTube Video option on the Media section's right side.
2. On the Embed YouTube Video popup window, copy and paste your product’s YouTube video URL.
3. Click the Embed Media button. The video will be embedded in your product page, and its thumbnail will start appearing in the Media section.

Add Alt Text
Adding alternative text to your media files is very effective. It helps screen-reading tools describe images to visually impaired readers and allows search engines to better crawl and rank your website.
You can add alt text in the following two simple steps after you upload the media files to your product.
1. Click the pencil icon on the media file thumbnail. It will open the Enter Alternative Text popup window.
2. Enter the alternative text to describe the image, and make sure it is user-friendly as well as SEO-friendly. Click the Add Text button to save.

Product management
This is the section where:
- You define your product type by selecting it from the dropdown selection menu. This selection list reflects the standard hierarchy of products used for dropshipping.
- Select the seller of the product from the dropdown. Only the sellers will be listed that are integrated with Cartzy for dropshipping. Currently, there are two selling platforms to select from:
- eBay
- Walmart

- The brand name field is customizable. You can add a brand name manually. To do so, start typing in the brand field and click the “+” sign to add it. Once you save the product, the brand name will also be saved.

Collection
Select the collection from the dropdown. Only those collections will be listed in the selection list that you have added to your store at the path: Product > Collections.
Whichever collection(s) you select, your product will appear under the selected collection(s) on the Webstore.

A product can be added to multiple collections as demonstrated in the image below.

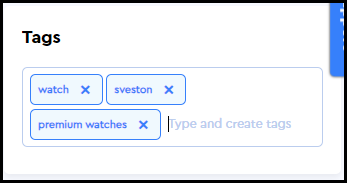
Tags
Tags are effective for search and SEO. You can enter the relevant tags to make your product easily searchable.
Inventory
This section enables you to enter the product information that is required to manage the product inventory.
- Source URL: This field is mandatory for dropshipping products. It’s not a mandatory field to fill in if you are adding your own product. For dropshipping products, this field reflects the URL of the product source. For example, if the product is imported from eBay, the URL will be that of the product page on eBay.
- Stock Keeping Unit (SKU): This field is mandatory even if you are adding your own product to Cartzy. It’s a unique identifier for the product to manage inventory.
- Barcode Type: It’s a mandatory field to fill in even if you are adding your own product. Select the appropriate barcode type from the dropdown list.
- Barcode ID: Enter a valid barcode ID against the selected barcode type. When the barcode ID is not valid, the system will generate an error upon saving the product information. This field is mandatory.
- Quantity: Enter the quantity of product that is available in stock.
- Track Quantity: Checkmark this option if you want to enable the system to track the quantity of the product. For example, it should update the inventory when a product is purchased. So, when all the product items are sold, the user will no longer be able to place an order for that product.
If you leave this option unchecked, it will be reflected as “Unlimited” in inventory. The system will not track the product quantity in this case.
- Track Quantity: Checkmark this option if you want to enable the system to track the quantity of the product. For example, it should update the inventory when a product is purchased. So, when all the product items are sold, the user will no longer be able to place an order for that product.
- Weight: Enter the weight of the product item in pounds (lbs).

Product options
If your product is available in different sizes or colors, you add this information in this section.
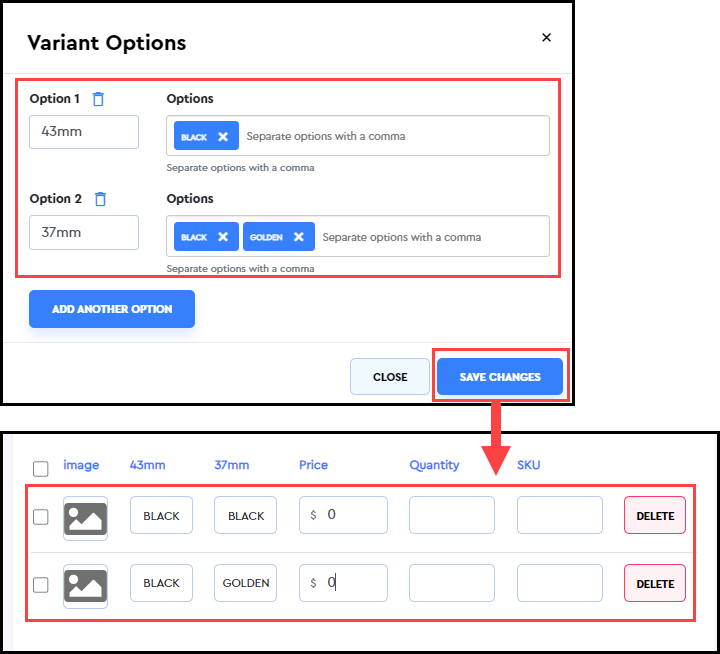
1. Checkmark the option to add multiple variants.
2. Click the Add/Edit options button.
3. On the Variant Options popup, click the Add Another Option button.

4. An option will be added along with two fields that you can use to categorize your product options based on different sizes and colors.
-
- Size: In the first field, enter the size of the product variant. Also, use valid sizing units such as mm, cm, etc.
- Other information: In the second field, you can enter the color names, or other categories against the size (in the first field). Use commas to separate different options/colors in one field that are available in the same size.
5. Click Save Changes to save the product variant information.
6. The saved product variants will be listed under Options along with the entered information as well as with the additional fields for you to enter the following against each listed variant:
-
- Price
- Quantity
- SKU
To get rid of any product variant, simply click Delete.
7. Once the variant items are added and listed to the product, you can add the image of each variant separately. To do so, click on the image placeholder, and a popup window will appear for you to select the product variant image.
8. As you select the image, a blue tick will appear on the selected image to mark it as “Selected.” Click Update.

9. The product variant thumbnail will be updated to display the selected image.


Bulk image update
If you want to place the same image for all the product variants, follow these steps:
1. Select all the listed variants under Options.
2. Click the button Update Images.
3. Select the image from the Select Product Variant Image window.
4. Click Update.
5. All the listed variants will have the same image for preview as selected.

Pricing
This section allows you to add the pricing details of your product.
-
-
Price: Enter the price of the product at which you are selling the product.
-
Compare at Price: This section comes in handy when you are dropshipping a product, and not selling your own product. So, you can enter a higher price here as compared to the price at which you are selling. This field is mainly used to drive the user’s urge to buy the product from you at a discounted price. For example, you can tell the user that the product’s actual price is $53 but on your store, they can purchase it for $50.5
-
Cost Per Item: This is solely for the purpose of admin’s business analysis of profits and margins. You can enter the actual cost of the product, and the margin and profit will be calculated against the cost and the price.
-
The Compare at Price field has nothing to do with the calculation of Margin and Profit.

Search engine listing preview
Here you can add the title and description of the product page as it should appear in search engine results. It does not affect the title and the description content that you added above. This content helps in search engine optimization, so you must ensure that it is SEO-friendly.
The page title content will also become the slug (end part) of the product page URL.
To add the content, click the link Edit Website SEO. Your content will be saved once you save the product by clicking the Save Changes button given at the top right corner of the page. Only then, the search engine listing preview will appear.

Front end (preview)

Feeds
Checkmark the social platforms if you want your product to appear in the feeds of the selected social media platforms. In simple words, it behaves like the news feeds of Facebook. So, when you checkmark a platform, for example, Google, the product will be added to the file of Google feeds which you can then add to your Google Merchant Account. You can learn more about it under the Feeds section of this knowledge base (article coming soon).
If you want to list your product on the other sales channels, you have to add your product to the respective sales channel list as explained below.

Sales channels
- Under this section, you can configure whether you want the product to be published to other sales channels.
- The currently listed sales channels are Facebook Marketplace and Walmart.
- So, if you checkmark a sales channel, the product is added to the list of that sales channel from where you can further manage and publish the product to the selected sales channel in its required formats.
Once you save the product with these changes, you can always go to the selected sales channel page configured in Cartzy, and you will notice that the new product has been added to the list of the selected sales channels for you to publish when needed.

For example, in the image below, the products are added to the list of Walmart. From here, you can export the list of these products in an XML file, and upload it to Walmart.

Walmart required information
When you select Walmart under Sales Channels, the Walmart Product Category selection field is enabled. This field defines the product type in the format required by Walmart.
Although you already defined the Product Type under Product Management, why add the product type again? The answer is that Walmart does not support the hierarchical categorization of products. So, to publish the product on Walmart, you need to define the product category in the format supported by Walmart.

Product Visibility
If you want to save the product, but don’t want to make it available on the store for the customers, you can simply check the option “Hide Product From Store Front” under Product Visibility.
So, rather than deleting the product, or not adding the product to the store, you can simply hide it.
Similarly, when you want the product to be displayed, you can undo this action by unchecking the option “Hide Product From Store Front” under Product Visibility, when you open the product in edit mode.

Success message
Once you have filled in all the details of your product, click the Save Changes button at the top right corner of the page. The following will occur:
- The newly added product will be saved to your store.
- A success notification will appear on the page.
- Your new product will be listed at the top of the Products page. From here, you can edit it further by clicking the kebab menu icon under Actions and selecting the Edit option. Learn more about managing your products.

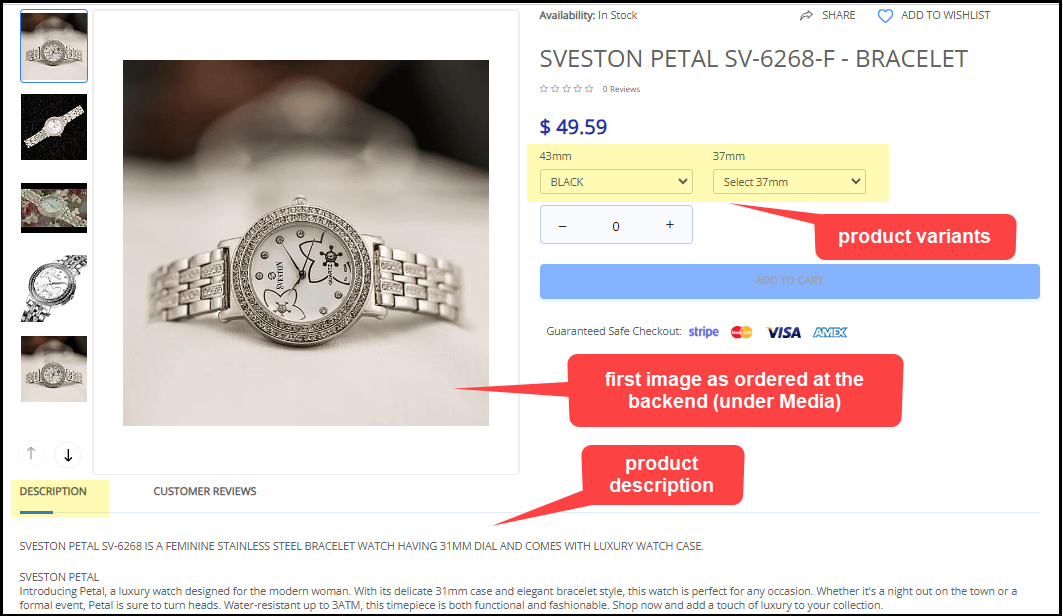
Front end of the product page
Now, if you view the product page on your store, you will see that the same information is reflected as it was added and saved.
The images below illustrate what the product page looks like on a Cartzy store.