
Table of Contents
- Uploading a new store logo
- Logo Builder - Design a new logo
- Accessing saved logos
- Deleting saved logos
- Removing the current store logo
- Changing the current store logo
The steps for setting up your store logo are simple and straightforward. However, if you have not created a logo for your online business yet, Cartzy can help you design one real quickly.
Navigation path: Store Management > Logo
While setting up your store logo, you can either upload a new logo from your device or you can select an image from already created/uploaded logos in the system.
Uploading a new store logo
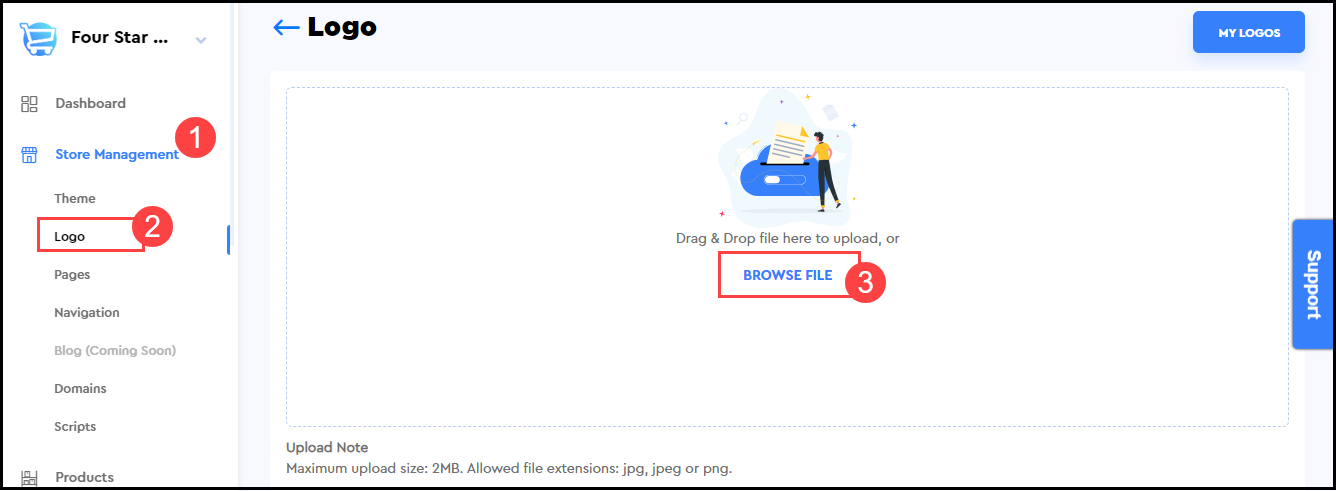
1. Expand Store Management from the left menu.
2. Click Logo to open the Logo setting page.
3. Click Browse File and select a logo image to upload from your device.
-
- Maximum file size supported: 2MB
- Support file formats: JPG, JPEG, PNG.
4. Once the logo image is uploaded, click the green tick-mark option to set it as your store logo. Once the uploaded logo image is saved, a success message will appear in a notification popup on the top-right corner of the page as illustrated in the image below.

Logo Builder - Design a new logo
Cartzy's built-in logo builder enables you to design a new logo in a few simple steps. So, if you don’t have a logo for your online store, don’t worry, Cartzy got you covered. Without wasting any time, just follow the below-mentioned steps and get yourself a brand-new logo that aligns with your store theme and fits your business needs!
1. On the Logo page, click the Create Logo button.

2. Upon clicking the Create Logo button, the Logo Builder will open with an initial form to fill in the following fields:
-
- Company Name
- Company Slogan
Enter the required information about your business, and click Continue.
👉 To go back to the previous page, click Back.

3. The Logo Builder will present you with a variety of pre-designed logos. You can scroll down and find a logo that aligns with your taste and business needs.

4. Once you find a logo of your choice, you can select from the following options to proceed with your selected logo design.
-
- Set as store logo
- Edit logo
- Save to My Logos
- Download Logo

Set as a store logo
Click the link “set as store logo”, if you find the design perfect to go on to your store page, and require no edits. As soon as you click it, the following will occur:
1. The selected logo will be saved as your store logo.
2. The Logo Builder page will be refreshed to display your current logo on the “My Logos” page.
3. A success message will be displayed as well.
Clicking the back arrow will take you to the main Logo page where you can see that your store logo has been updated to the newly designed logo.

Save to My Logos
Clicking this option will save the logo design to your logos.
The My Logos page will open up to display the saved logo as shown in the image below.

Download Logo
Clicking this option will download the logo (PNG format) on your device.
Edit logo
If you click the pencil icon to edit the logo design, you will be navigated to the logo editor as shown in the image below.
You can switch between the following four available tabs to customize your logo.
- Logo Text
- Logo Fonts
- Logo Text Colors
- Logo Layout
Preview: Whatever changes you make to your logo design, its real-time preview will be displayed on the right side of the page.

Logo Text
You can change the logo text here.

Logo Fonts
Here, you can select the font style for the text in your logo design.

Logo Text Colors
On this tab, you can change the colors of:
- The text in your logo design
- Icon/shape of the logo design
- Logo background

For logo designs with company slogan text, you can select a different color for the company slogan.

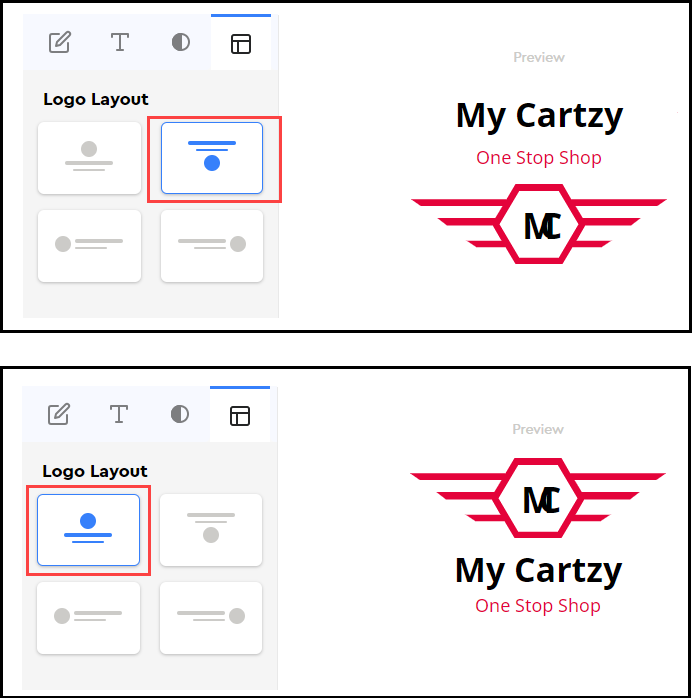
Logo Layout
The Logo Builder allows you to select a logo layout of your choice from the available options. You can switch between different layouts to preview the different orientations of text along with the icon.
Logo design with only one layout

Logo design with multiple layout options
Actions
Once you are done customizing your logo design, you can click the Actions button to save, download, or set up your logo on your store.

Upon clicking the Actions button, the following options will appear in a drop menu.
- Set as store logo: Clicking it will set your customized logo as your store logo as explained above in this article. You will be navigated back to the main Logo page.
- Download: It will download the customized logo as a PNG file on your device.
- Save to my logos: It will save your new logo in the system. My Logos page will open to display the saved log.

Accessing saved logos
To access your saved logos, you can click the button “My Logos” on the Logo page. This page will display all the logos that you have customized and saved so far. On this page, you can:
- Set a saved logo as your store logo
- Download a logo design (PNG file)
- Delete a saved logo

Deleting saved logos
To delete a saved logo image file from the system, follow the steps mentioned below:
1. Go to the Store Management > Logo > My Logos.
2. Click the bin icon available below the unwanted logo image.
3. On the Remove Logo confirmation popup, click Remove.

4. Upon confirming the remove action, the image will be deleted and thus its thumbnail will also disappear from the My Logos page. A success message will be displayed in a notification popup as well.


Removing the current store logo
To remove the current store logo, follow these steps:
1. Go to Store Management > Logo.
2. Click on the dropdown arrow next to the Change Logo label, below the logo image.
3. Click Remove Logo.
4. On the Remove Logo confirmation popup, click the Remove Logo button.

5. The current logo of the store will be removed, and no logo image will be displayed in this case. It indicates that your store logo is currently not configured.
6. Now, if you click the My Logos button, you will see that the removed logo image is still saved in the system. The only difference is that it is no longer marked as “Current”. If you want to entirely delete this image from the system, you can do so, since you couldn’t delete it when it was set up as your store logo.

Changing the current store logo
You can change your current store logo in the following three ways:
1. Upload a new Logo
2. Select from My Logos
3. Remove Logo
All of these are explained above in this article.
