
Table of Contents
- Search for a product
- Sorting the product list
- Products per page
- Export products details
- Edit product quantity
- Edit product details
- View products
- Delete a product
- Post a product to Facebook
- Create a new product
- Video: Cartzy products & collections
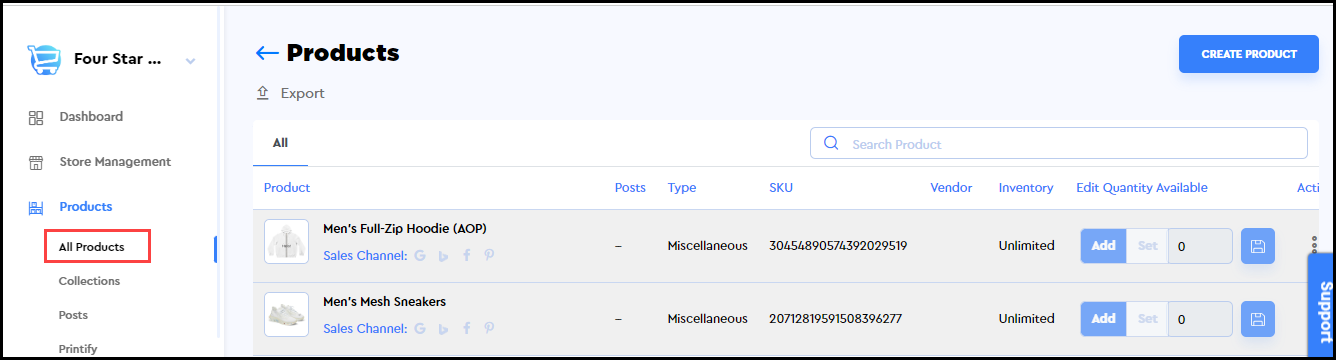
Cartzy enables you to view and manage your products in one place, ensuring efficiency in your workflow.
Path: Products > All Products
On the Products page, you can view all the products that are added to your store along with the following information against each product:
- Post: It identifies if the product is posted on your Facebook page.
- Type: It is the category of the product.
- SKU: It’s the stock-keeping unit that is unique to each product.
- Vendor: Displays the vendor of the product.
- Inventory: It displays the status of the product stock available in inventory.
Besides, having an overview of all your products, you can also perform some functions for product management by using the features available on this page, such as:
- Search for a product
- Sorting the products list
- Export products’ details
- Edit product quantity
- Edit product details
- View product (on your store)
- Delete a product
- Post a product to Facebook
- Sorting the products list
Search for a product
Cartzy has implemented a “search by keyword” functionality for its product search. You can simply type a keyword to search for the particular product(s). All the matching products will be sorted and displayed as demonstrated with an example in the image shared below.

Sorting the product list
You can sort the products list chronologically and vice versa by clicking on the arrow given at the top of the products list. It will sort the products by name in chronological order or reverse chronological order.
You can also sort the products by posts, type, SKU, vendor, and inventory by clicking on these labels respectively.

Products per page
If you scroll to the bottom of the Products page, you can control how many products you want to view on one page when managing products through the admin panel. You can use the dropdown selection list to configure the number of products you want to view at a time. By default, this value is set to 25.

Export products' details
You can also export your products in a CSV file. To do so:
1. You need to click on the Export option given at the top left corner of the page. You will be prompted to select the products that you want to export.
2. On the Export Products popup window, you can select between the following two options:
a. Current page: It will export the products that are displayed on the current view/page. For example, if the page currently displays only 10 products, then only those product details will be exported to the downloaded CSV file.
Also, if you search for a particular product by a keyword, and the page displays only two products in the result, then the exported CSV file will contain the details of only those two products that appeared in response to your search.
b. All products: Selecting this option will export the details of all the products that are added to your store irrespective of the current page view.
3. Click the Export Products button. A CSV file, containing the products details, will be downloaded on your computer.

Edit product quantity
There are two ways you can edit the quantity of your products to keep the inventory updated and make it reflect authentic data for the customers.
1. Add: It will increase the product quantity by adding the new value to the previous inventory value of the product.
2. Set: It will set the product inventory value to the new value that you assign to the product quantity irrespective of the previous value displayed under the product inventory.
Adding to the product quantity
1. Select the Add option.
2. Increase the digital value using the numeric-up-down controller.
-
- Up arrow: increases the value by 1 each time you click on it.
- Down arrow: decreases the value by 1 upon each click.
3. Once you have adjusted the product quantity value that you want to add to the existing inventory value of the product, click the Save icon.
4. The inventory value of the product will be increased by the number you selected in the numeric-up-down controller. A success message will also be displayed in a popup notification.

Setting a product quantity
You can use this feature to reset the quantity of a product to a new value. This feature comes in handy especially when you want to decrease the number of products according to the updated stock.
Example scenario:
- Actual increase in product quantity: 4 units
- You increased the product quantity by 5 units
- Previous product inventory value: 3 units
- Using the Set feature, you can undo the manual error in inventory updates: You set the new value to 3+4 = 7 units.
The sequence of steps to follow:
1. Select the Set option.
2. Increase/decrease the digital value using the numeric-up-down controller.
a. Up arrow: increases the value by 1 each time you click on it.
b. Down arrow: decreases the value by 1 upon each click.
3. Once you have adjusted the product quantity value that you want to assign to the inventory value of the product, click the Save icon.
4. The inventory value of the product will be updated to the number you selected in the numeric-up-down controller. A success message will also be displayed in a popup notification.

Edit product details
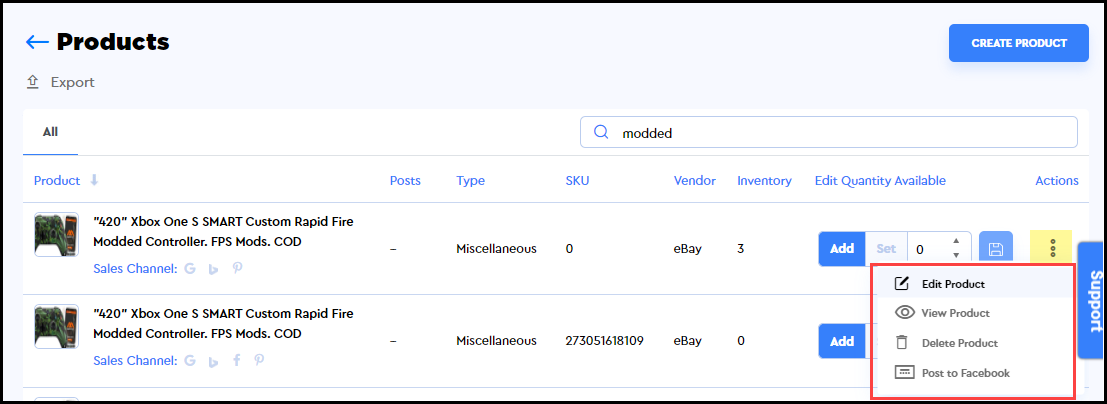
To edit a product, you can either click on the product name, or you can click the kebab menu and select the Edit Product option. You will be navigated to the Edit Product page which is the same as that which opens for creating a product but pre-populated with product details to which you can make modifications.

After making the desired changes to the product details, click the Save Changes button. Otherwise, you will lose updates that you made to the product.
Upon saving the edits, a success message will appear in a popup notifying you that the changes have been saved successfully.

View products
To see how your products look on your store website, click the kebab menu icon > select View Products.

The product page will open in a new tab, enabling you to see the product display in your online store.

Delete a product
To delete a product:
1. Click on the kebab menu icon > click Delete Product.
2. On the Delete Store Product confirmation popup window, click the Delete Product button to confirm your action.
3. The product will be deleted from the store, and a success notification will appear in a pop. The page will be refreshed to display the updated product list.

Unable to delete a product
You can only delete a product against which no order has been placed. If there is a product against which a customer has already placed an order, an error message will be displayed when you attempt to delete that product.
In this case, you will first need to manage/delete the order placed against that product.

Post a product to Facebook
If you are also keen on running your e-commerce business on the Facebook marketplace, then you can directly post your products to your Facebook store with a single click. To do so,
1. Click the kebab menu icon > select Post to Facebook.
2. On the Post to Facebook popup window, you will see that the product name and description are pre-populated.
-
- You can edit the Post Message/product description.
- Using the dropdown, select the Facebook page to which you want to list your product, and click Post.
3. The product will be listed in your Facebook Marketplace products list, and you will get a message of success.

Unable to post a product on Facebook
If you have not configured your Facebook Marketplace account with your Cartzy account, then you won’t be able to select anything under Facebook Page(s) on the Post to Facebook popup window. You will get an error message instead, directing you to connect your Facebook page with Cartzy. So, click Discard, and go to Sales Channels > Facebook Marketplace to link your Facebook page to your Cartzy store.

Create a new product
Adding a new product to your store is straightforward. You can simply click on the Create Product button given at the top right corner of the Products page. It will navigate you to the Add Product form, where you can fill in the required information and save your new product details. Learn how to manually add a product to Cartzy.

Video: Cartzy products & collections
Shared below is a quick demo video for you to learn how to add products and manage product collections in your Cartzy store.
