
Table of contents
- Add customer details
- Add products
- Discounts and shipping fees
- Notes and Tags
- Create order | payment status
Manually creating an order is a rare case that occurs in the drop shipping business. 99% of the time, the order is placed through the website/online store by the customer. However, if you ever have to place an order on behalf of a customer from the backend of your Cartzy store, explained below is the process to do so.
Navigate to the path: Orders > All Orders > Create Order. The Create Order page will be opened as shown in the image below.
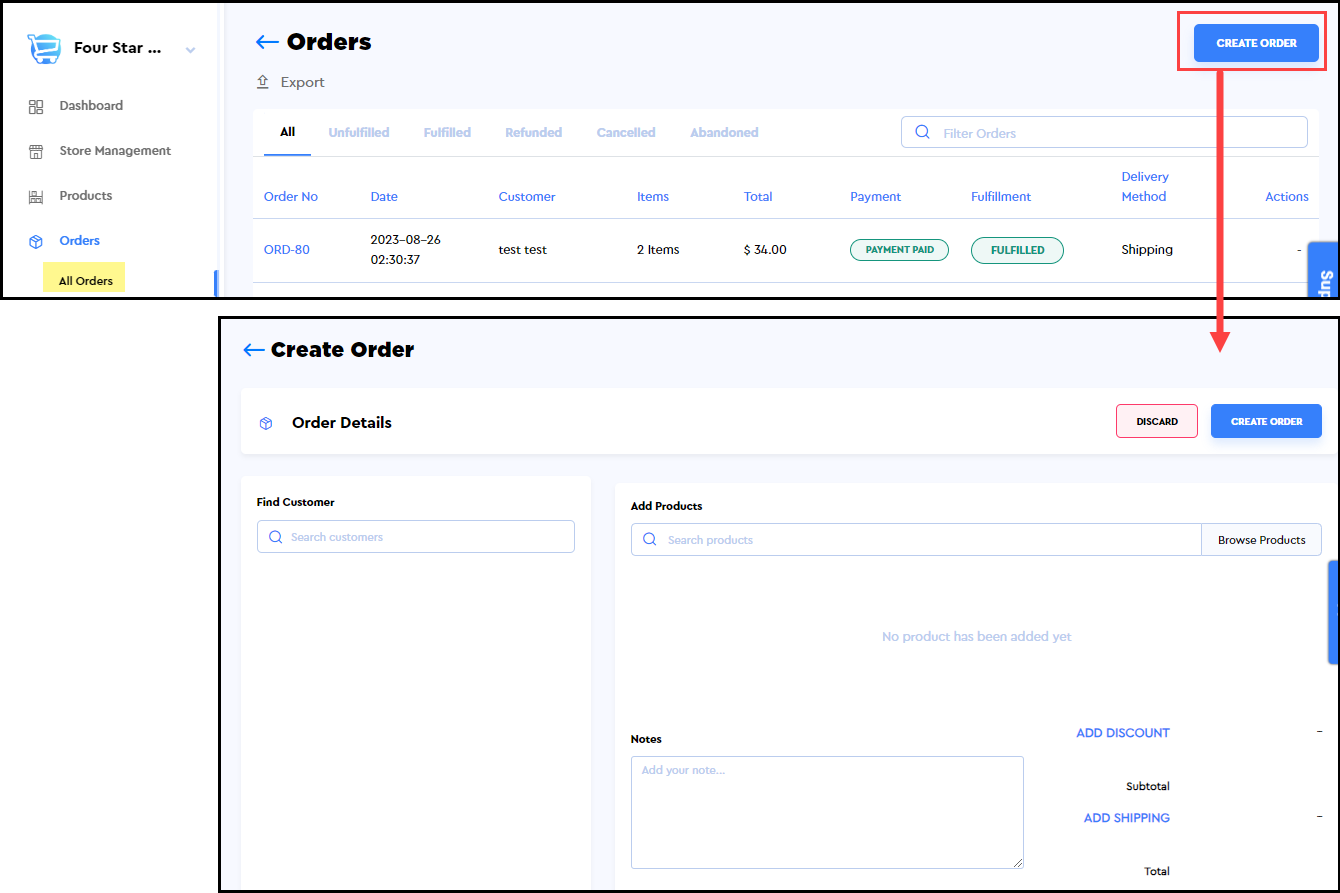
On the Create Order page, the following sections are available for you to add the details of the orders as well as to configure the total price and payment status.
1. Customer details
2. Products
3. Discounts & Shipping fee
4. Notes & Tags
5. Payment status
Add customer’s details
Using the search bar given in the Find Customer section, you can search for the customer by customer name or email. If the customer is already registered in your store, their name will appear in the search results list from where you can select the customer’s record.
As soon as you select the customer, their contact details, shipping address, and billing address will be populated as demonstrated in the image below.

Adding products
Under the Add Products section, you can add the requested products to the order by following these steps:
1. Search for the products by using the search bar or by clicking the Browse Products button. In both cases, the Select Products popup will appear.
2. In the Select Products popup, you can search the wanted products by name or product code.
3. Once the searched products are sorted, click the checkbox(es) to select the wanted product(s) from the list.
4. Click Done.

5. The selected product(s) will be added to the order as shown in the image below. The Total price will be updated to display the price of the product(s). You can further apply discounts and apply shipping fees as explained in the next section.

|
Notes:
|

Discounts and Shipping Fee
Once you add the wanted product(s) to the order, you can apply the discounts and shipping fee to the order amount. These charges will be reflected in the Total price as well.
Discount
1. To give a discount to the customer on the added product(s), click on the Add Discount link. On the Add Discount popup, enter the discount amount (in digits only). For example, if you want to sell a product with $10 off its original price, you will enter “10” in the field.
2. Also, type in the reason for the discount in the Reason field. For example, loyalty discounts, Christmas offers, etc.
3. Click Apply, and the added discount will be applied to the price of the product(s). The discounted price will be reflected in the Subtotal, as well as in the Total price.
Shipping Fee
1. To apply shipping charges or to define if the shipping is free, click the link “Add Shipping.”
2. On the Add Shipping popup, the Free Shipping option will be checked by default. You can click Apply to confirm the free shipping of the added products.
3. The Free Shipping label will appear as illustrated in the image below. In this case, the Total price will be equal to the Subtotal.

The image below shows the two orders placed for the same item with and without discount.

| ❗️ Discounts and shipping charges can only be applied at the time of order creation. Once the order is created, you cannot apply any discount or shipping fees to the order in edit mode. |
Notes and Tags
Notes
In the Notes section, you, as an admin/support rep/sales rep, can add the notes or additional instructions for the order that you are placing on behalf of the customer. For example, they don’t want the order to be delivered before a certain date or so.
Tags
Tags help in the search of a record or define the status of a record. You can add your tags as per your requirements. For example, you want to remember that the person has been contacted already, or you can add the tag of the product name.

Create Order | Payment Status
Once you have added all the information required to create an order on behalf of your customer, you can proceed to the payment section “Accept Payment.”

If you have not received the payment, and you want to simply click on the Create Order button given at the top right corner of the page, even then you will have to define the payment status of the order.
In short, defining the payment status of the order is a mandatory step for creating an order. Hence, whichever of the following buttons you click, the Create Order popup will appear asking for the payment status.
1. Create Order: Clicking this button will also take you to the steps where you have to define the payment status and payment medium as explained below.
2. Mark as Paid: In this case, the Accept Payment field will be pre-populated with the “Mark as Paid” option. If the customer has already paid the price for the ordered products, you can select this option.
3. Mark as Pending: In this case, the Accept Payment field will be pre-populated with the “Mark as Pending” option. This option will be selected if the customer has not paid the amount of the ordered products.
Type of Payment Expected:
Currently, Cartzy supports payment only through Stripe, that’s why only the option of Stripe will be available.
Once you have selected the appropriate payment status, click Create Order on the Create Order popup.

Order Created
Upon clicking the Create Order button, the following will occur:
1. The order will be created successfully.
2. A notification of success will appear at the top right corner of page.
3. The page will be refreshed to open the page of Orders. The newly created order will be listed at the top.

| ❗️All the newly created orders will have the fulfillment status as “Unfulfilled” as the order fulfillment is done manually in the dropshipping business that you are running through the Cartzy store. |
Paid order
An order that was created with the payment status “Payment Paid” will be listed on the main Orders page, as demonstrated in the image above.
Order with payment pending
When the order is created with the payment status “Payment Pending”, the order is not listed on the main Orders page. Such an order will appear on the customer’s details page as demonstrated in the image below.
